Showing posts with label Breads. Show all posts

Monday, June 29, 2009

Coconut Breads


I saw these wonderful breads on Baking Bites, and just had to try them. The original recipe came from Bill Granger--thick coconut bread with a nice touch of cinnamon, served toasted with butter. Ummm....The lemon version, adapted by Nicole Weston of Baking Bites, is wonderful also. The coconut-lemon combination is bright and delicious. This recipe makes a large, sturdy tea loaf, not overly sweet and definitely improved with toasting and butter. Continue for recipe.

Bills Coconut Bread
from Baking Bites

2 1/2 cups all purpose flour
2 tsp baking powder
1/2 tsp salt
2 tsp ground cinnamon
1 cup + 1 tbsp sugar
2 cupps shredded coconut
2 large eggs
1 1/4 cups milk (lowfat is fine)
1 tsp vanilla extract
1/3 cup butter, melted

Preheat oven to 350F. Grease and flour a 9×5-inch loaf pan. In a large mixing bowl, whisk together flour, baking powder, salt and cinnamon. Stir in sugar and coconut. In a medium bowl or a large measuring cup, whisk together eggs, milk and vanilla. Make a well in the center of the dry ingredients and pour in egg mixture. Stir until just combined and only a few streaks of flour remain.Add in melted butter and stir until just smooth, being careful not to overmix. Pour into prepared loaf pan and bake for 60-65 minutes, or until a toothpick inserted into the center comes out clean. Turn loaf out onto a wire rack to cool completely before slicing.

Makes 1 loaf; or 8 large slices.
Serve toasted, with butter.

For Lemon Version:

Omit cinnamon.
Use 3/4 c milk and 1/2 c fresh lemon juice.
Add 1T lemon zest.


Continue......

Sunday, August 24, 2008

Cornbread


I really love cornbread! I'm a Northern fan--I like a sweet cornbread, slathered in butter and then drizzled with honey. So good with soups and chilis, but equally satisfying for breakfast. This is just a basic recipe--but good! Recipe coming soon!

Type rest of the post here

Continue......

Monday, May 26, 2008

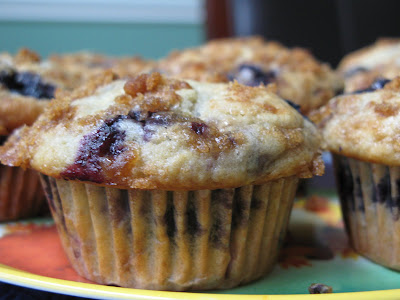
Big Blueberry Muffins


Yum!! What a great way to start off a holiday weekend--a treat for breakfast! I saw a post for these fabulous muffins on Baking Bites, a neat blog that has scrumptious recipes. I modified the original recipe a bit, using part brown sugar and all butter and added a struesel topping. They are delicious! This might be my favorite blueberry muffin recipe yet! Nice and big and moist with lots of blueberries. Great muffins. Continue for muffin recipe.


Big Blueberry Muffins

1 1/2 cups all purpose flour
1/2 tbsp baking powder
1/4 tsp baking soda
1/4 tsp salt
5 T unsalted butter
1/4 cup sugar
1/4 cup brown sugar
1 large egg
1/2 tsp vanilla extract
3/4 cup buttermilk
1 cup (fresh or frozen) blueberries

1-2 T melted butter
brown sugar
cinnamon

Preheat oven to 375F. Line 8-9 muffin tin cups with paper liners.
In a medium bowl, whisk flour, baking powder, baking soda and salt.
In a large bowl, cream together butter and sugar until light.
Beat in the egg, followed by the vanilla extract.
Alternate buttermilk and flour into butter mixture, ending with an addition of flour and working in 2 or three additions.
Stir in blueberries.
Divide batter evenly among muffin cups.
Mix melted butter, brown sugar (to desired consistency), and cinnamon and sprinkle on top of muffin batter for the topping.
Bake for 18-22 minutes, until tops are lightly browned and a tester comes out clean.Cool on a wire rack.
Makes 8-9 big muffins.

Continue......

Friday, November 16, 2007

Grandma's Cranberry Bread


My grandmother always had a loaf of cranberry bread in her freezer to have ready when we requested it. We loved it. "I want cranberry bread, Grandma!" It reminds me of her home in Missouri and her kitchen, in which she was always preparing good meals for us. Comforting food. Old-fashioned home-cooking. She served this bread for both Thanksgiving and Christmas and usually included small tins with her holiday baskets filled with goodies that she made for family and neighbors. Sometimes, she baked in tin cans, giving the bread a nice round shape. Sadly, my grandma doesn't remember how to bake anymore--having succumbed to the slow progression of Alzheimer's--but she does remark, "I think I used to make something like this!"

It's recipes like this bread that provide a special connection through the generations and a sense of continuity with those that have come before us. It's important for me to preserve these family culinary traditions, passing them along and keeping the memories alive. My grandma's memories may be gone, but a portion are still alive with me and my family to enjoy and cherish and share with our children.

So, with a theme of Traditional Feasts, I am going to contribute this post to the Monthly Mingle blog event, and pass on this traditional recipe to others as well. Enjoy! Continue for bread recipe.


Grandma's Cranberry Bread

Yield: 2 loaves

2 1/4 cups flour
2 teaspoons baking powder
1/4 teaspoon salt
1 1/4 cups sugar
1/2 teaspoon baking soda
2 eggs, slightly beaten
1 1/4 cups cranberries, sliced round or coarsely chopped (or closer to 1 1/2 cups)
3 tablespoons shortening
1 cup nuts (I like walnuts)
1 tablespoon orange rind, or a bit more
juice of one orange plus enough boiling water to make one cup liquid (or 1 cup orange)


1. Sift first five ingredients together twice. (Alternatively, pulse in food processor.)

2. Add shortening to cup of hot juice (it should melt some); add eggs and rind.

3. Add juice mixture to dry ingredients; fold together.

4. Add chopped nuts and cranberries.

5. Bake at 350 degrees until edges start to color and toothpick inserted comes out clean. (This is roughly 30 minutes, more or less, for 2 loaf pans).

Continue......

Monday, November 5, 2007

Blueberry Muffins


My husband, being such a thoughtful guy, wanted to bring breakfast to the office today for one of his less fortunate co-workers, " The Giant." Apparently, they make friendly wagers over sporting events, and "The Giant" continually loses, forcing him to pay for lunch. My husband just thought he'd do something kind for the loser, in anticipation of "The Giant's" eminent downfall next week. Someday he will learn--my husband is the WINNER!! :) So, these cinnamon-topped blueberry muffins are en-route to the office--enjoy!


Recipe coming soon!

Blueberry Muffins
from The Best Recipe


Continue......

Monday, October 22, 2007

Pumpkin Muffins, Bread, and almost Cupcakes


Pumpkin season is here! And it's finally getting cool in Houston. It's fall! Time for lots of squash. :) These are my favorite spicy pumpkin muffins (or bread). Cloves, nutmeg, and cinnamon combine perfectly with the pumpkin, getting even better the day after baking. And so moist! I usually cut back on the oil and use buttermilk and or applesauce to fill in. Today, I added dried cranberries, but they're also great with walnuts. This is such a versatile recipe. And they freeze wonderfully. I always freeze one of the loaves or several muffins.


I had every intention of turning these into cupcakes with an orange-clove cream cheese frosting for the Cupcake Hero event hosted by Laurie of Quirky Cupcakes and Stefani of the Cupcake Project but they didn't make it that far. Next time!! They're so good to grab on-the-go for breakfast that I just didn't get to the frosting. Anyway, I used pastry flour (part cake flour) to make them lighter and more cupcake-like. For bread, I think I like the texture of all-purpose. But yum! I'll have to make more for cupcakes! Continue for pumpkin recipe.

Spicy Pumpkin Bread

by Rose

2 cups sugar ( I usually use part brown sugar--can cut down to 1 2/3 cups if just making it for myself)
2/3 cup oil (or even 1/2 if you're really dieting :) --then substitute the rest with buttermilk to equal 1 cup)
1/3 cup buttermilk
1-2 T applesauce
3 large eggs
1 can solid pack pumpkin (16 ounce)
3 cups all purpose flour
2 teaspoon ground cloves
2 teaspoon ground cinnamon
2 teaspoon ground nutmeg
1 teaspoon baking soda
1/2 teaspoon salt
1/2 teaspoon baking powder
1 cup coarsely chopped walnuts (optional but good!)

Preheat oven to 350°F. Butter and flour two 9x5x3-inch loaf pans.
Beat sugar and oil in large bowl to blend.
Mix in eggs and pumpkin.
Sift flour, cloves, cinnamon, nutmeg, baking soda, salt and baking powder into another large bowl.
Stir into pumpkin mixture in 2 additions. Mix in walnuts, if desired.
Divide batter equally between prepared pans.
Bake until tester inserted into center comes out clean, about 1 hour 10 minutes.
Transfer to racks and cool 10 minutes. Using sharp knife, cut around edge of loaves. Turn loaves out onto racks and cool completely.

Continue......

Wednesday, October 17, 2007

Basic Sourdough Bread


What a wonderful loaf! This is another great recipe from Peter Reinhart's The Bread Baker's Apprentice. The bread's deep flavor was developed over 3 days and the resulting loaves were terrific! After feeding my starter (or barm, which I like to keep fairly wet, about the consistency of pancake batter), a firm starter was made and then allowed to ferment overnight. The next day, the final dough was mixed, rose, and then shaped. The loaves were retarded in the refrigerator overnight and then baked on the following day.

Both the texture and flavor are really nice in this bread. I used all King Arthur Bread flour for these loaves. The result was slightly chewy but beautiful airy with a perfectly crunchy crust. I'm excited to try many variations of this basic recipe! Continue for Sourdough recipe.

Basic Sourdough Bread
from the Bread Baker's Apprentice

Makes two 1 1/2-pound loaves

Firm Starter
4 oz barm (wet starter--fed)
4.5 oz bread flour
1-2 oz water

Final Dough
20.25 oz bread flour
.5 oz sea salt
12-14 oz lukewarm water

Semolina flour for dusting

1. Remove starter from the refrigerator and measure it out 1 hour before making the firm starter to take off the chill.
2. Add the flour to the bowl and mix together the barm and the flour, adding only enough additional water so that you can knead this into a small ball. You don't need to work this very long, just until the flour is hydrated. Lightly oil a small bowl and place the starter in the bowl, turning to coat with oil. Cover.
3. Ferment at room temperature for approx. 4 hours, or until the starter has at least doubled. Put it into the refrigerator overnight.
4. Remove the starter from the refrigerator 1 hour before making the dough. Cut it into about 10 small pieces with a knife or pastry scraper. Mist with spray oil, cover with plastic and let sit for 1 hour to take off the chill.
5. To make the dough, stir together the flour and salt in large mixing bowl. Add the starter pieces and enough water to bring everything together into a ball as you stir with a large spoon.
6. Sprinkle the counter with flour, transfer the dough to the counter and knead by hand for 12-15 minutes. Adjust the water or flour as needed. The dough should be firm but tacky. It should pass the windowpane test. Lightly oil a large bowl and transfer the dough to the bowl, coating it with oil. Cover the bowl with plastic wrap.
7. Ferment at room temperature for 3-4 hours, or until dough has nearly doubled in size.
8. Gently remove the dough from the bowl and divide it into 2 equal pieces (or smaller if making rolls), being careful to degas the dough as little as possible. Gently shape the dough into boules, batards, or baguettes.
9. Proof the dough in bannetons or proofing bowl (lined with towel, sprayed with oil, then floured), or on parchment-lined sheet pans that have been dusted with semolina flour. Mist the exposed part of the dough with spray oil and loosely cover the dough with plastic wrap. Proof the loaves for 2-3 hours, or retard overnight in the refrigerator, removing them approx. 4 hours before baking them the next day (I proofed overnight with these).
10. Prepare the oven for hearth baking with a baking stone in the bottom 3rd of the oven and a steam pan on the top shelf. Preheat the oven to 500. Carefully remove the plastic wrap from the dough 10 minutes before baking.
11. Generously dust parchment lined peel with semolina flour and gently transfer the dough to the peel. Score the dough. Slid the dough onto the stone. After 30 seconds, spray the oven walls with water and close the door. Repeat 2x more at 30 second intervals. After the final spray, lower the oven setting to 450 and bake for 10 minutes. rotate the loaves 180 degrees and continue baking for another 10-20 minutes. They should be a rick golden brown allover, and sound hollow when thumped on the bottom.
12. Transfer the finished loaves to a rack and cool for at least 4 minutes before slicing.

Continue......

Tuesday, September 18, 2007

My Zucchini Orange Walnut Bread


Growing up, zucchini bread was always a staple at my grandma's house. She either had one in the oven or in the freezer. She frequently made hers with pineapple, which made a moist loaf, or with raisins. I've adjusted my recipe several times and decided on a very good loaf made with walnuts and applesauce. But this time, I fine tuned the recipe again and YUM! The results were wonderful! I'm really quite proud of this loaf. :)

It is so light and tender for a zucchini bread. I used pastry flour instead of all-purpose, a great substitution for low-fat baking. Cutting back on the fat, I used part applesauce and this time added part buttermilk for the liquid ingredients. And for a new twist on the flavor, I added orange zest. It really went nicely with the cinnamon and walnuts. So moist and delicious!! Continue for Zucchini Orange Bread recipe.

Zucchini Orange Bread
by Rose

3 cups pastry flour**
1 t salt
1 1/2 t baking soda
1 t baking powder

3 t cinnamon
1 1/2 to 1 3/4 cups sugar (depending on your sweet tooth)
Zest of one orange
3 eggs
1/3 cup oil
1/3 cup buttermilk
1/3 cup unsweetened applesauce
3 t vanilla
2-3 cups zucchini (I usually go with 3)

1 cup chopped walnuts

Preheat oven to 325 degrees and prepare 2 loaf pans for baking.
Combine first five ingredients in large bowl; whisk or sift to distribute.
In a separate bowl, mix sugar with orange zest, rubbing the zest into the sugar with your fingers until fragrance is released.
Add sugar-orange to other dry ingredients and mix.
In another bowl, combine liquid ingredients; add to dry flour mixture.
Mix until just combined.

Add zucchini and walnuts, fold in just until mixed in, and pour into prepared pans.
Bake at 325 for one hour.

** I make my own: 4 c all-purpose + 2 1/4 cup cake flours = 6 1/4 cup pastry flour)--good for low-fat baking.


Continue......

Monday, September 3, 2007

Multigrain Sandwich Loaf


I'm so excited about my new Peter Reinhart cookbook, Whole Grain Breads! This was my first recipe and it really turned out well. It has a wonderful texture and great whole grain flavor. It is just perfect for sandwiches. Whole wheat breads are often too dense and heavy tasting, but this one is very nice!

The recipe starts the day before baking with a biga (starter) and a soaker that contains the whole grains. Reinhart gives the baker options on ingredients, allowing for personal taste and variation. I really like this about his recipes. You can make many slightly different loafs all from the same basic recipe. It does make it important to weigh your ingredients though, instead of measuring by volume--especially with the whole grains. Volumes can differ greatly depending on which grains you use. Weighing is so nice with baking, allowing for much better reproducibility.

I made this loaf largely an oat bread, choosing to use steel cut oats for the cooked grain, along with oat bran and rolled oats. Cornmeal, whole wheat, and flaxseeds rounded out the whole grains and I used buttermilk and brown sugar (also options in the recipe). In the soaker, I used a combination of whole wheat and bread flours. Very nice! I'm excited to try new variations of this loaf soon. Next time I make brown rice, I'll save some for bread! Continue for Multigrain Sandwich Loaf recipe.


Multigrain Sandwich Bread adapted from Whole Grain Breads Makes 1 large loaf

Soaker
28.25 g whole wheat flour
28.25 g unbleached bread flour
56.5 g cornmeal
56.5 g rolled oats
42.5 g cooked steel cut oats
7 g oat bran
7 g whole flaxseeds
4 g sea salt
170 g buttermilk

Mix all of the soaker ingredients together in a bowl for about 1 minute, until all of the flour is hydrated and the ingredients form a thick, porridge-like dough.
Cover loosely with plastic and leave at room temperature for 12-24 hours (I actually moved mine to the fridge the following day and made my bread the next day--it's good for 3 days in the fridge.)

Biga
227 g unbleached bread flour
1 g instant yeast
142 g filtered water, at room temperature

Mix all of the biga ingredients together to form a ball of dough. Using wet hands, knead the dough in the bowl for 2 min. to be sure all of the ingredients are evenly distributed and the flour is fully hydrated. The dough should feel very tacky. Let the dough rest for 5 min., then knead it again with wet hands for 1 minute. The dough will become smoother but still be tacky.
Transfer the dough to a clean bowl, cover tightly, and refrigerate for a least 8 hrs. and up to 3 days. (I used mine 36 hrs. later).

2 hours before mixing the final dough, remove the biga (and soaker if it's been longer than 1 day) from the fridge.

Final Dough
all of the biga
all of the soaker
28.5 g whole wheat flour
5 g salt
7 g instant yeast
42.5 g brown sugar
1 T unsalted butter, melted

Using a pastry scraper, chop the soaker and the bigan each into 12 smaller pieces. Sprinkle some extra flour over the pre-doughs to deep the pieces from sticking back together.
Combine the soaker and biga pieces with the other ingredients except the extra flour and stir vigorously for about 2 min., until all of the ingredients are evenly integrated. The dough should be solft and slightly sticky.
Dust the counter with flour, then toss the dough in the flour to coat. Knead by hand for 3-4 min., incorporating only as much extra flour as needed, until the dough feels soft and tacky, but not sticky.
Form into a ball and let it rest for 5 min. while you prepare a clean, lightly oiled bowl.
Resume kneading the dough for 1 min (I kneaded mine for 5 more min. to pass the windowpane test--gently stretch a piece of dough to see if it will hold a paper-thin, translucent membrane). Dough will have strength yet feel soft, supple, and very tacky.
Form dough into a ball and place in the prepared bowl, spraying lightly with oil. Cover loosely with plastic and let rise 50 min (45-60)--1 1/2 times its original size.
Transfer dough to a lightly floured counter and form it into either a loaf or a batard shape (I made a batard this time but think I like this bread as a loaf).
Coat loaf lightly with a beaten egg white, and sprinkle with poppy seeds. Mist top of dough with pan spray, cover loosely with plastic wrap, and let rise for 46-60 min. (50), until it is about 1 1/2 times its original size.
Preheat oven to 425. For my freestanding loaf, I prepared oven for hearth baking: pan of water on the very top rack and preheated baking stone.
When the dough is ready to bake, place it in oven, pour 1 cup of hot water into the steam pan, lower the temp. to 350, spray sides of oven with water and bake for 20 min., spraying oven walls at 1 and 2 minutes.
Rotate the loaf 180 degrees and continue baking for another 25 min, until the loaf is a rich brown.
Transfer bread to a cooling rack and allow to cool for at least 1 hour before serving.


Continue......

Thursday, August 30, 2007

Beer Bread with Green Chiles, Cumin, and Cheese


More chiles! I needed something to go with my stew and decided to make a quick beer bread. These loaves are nice because they take about 2 minutes to mix up and only 45 min. to bake. So you can get home from work and fill the house with the smell of bread within one hour! I added cumin, roasted green chiles, and a Mexican cheese blend to this batch and it turned out deliciously. It really complemented the stew. But you can use any flavors that you want. It's not the most beautiful bread, it's scraggly, but nice, easy, and tasty! Continue for Beer Bread recipe.

Basic Beer Bread

3 cups all-purpose flour ***
2 T sugar
1 1/2 t salt
1 T baking powder
12 ounces beer
Optional seasonings (For this loaf, I used 1 large t cumin, 1 cup shredded Mexican cheese, and 4 chopped green chiles)

***(I used self-rising flour this time, omitting the salt and baking powder)

Top with either an egg wash (1 egg + 2 t water + tiny pinch of salt) before baking, or 2 T melted butter immediately out of the oven.

Heat oven to 375 degrees.
Combine all dry ingredients.
Stir in the beer and mix until just combined. (Batter will be thick but add a tad of water if it is very dry--might need to if substituting whole wheat).
Pour into 9 x 5 loaf pan.
Brush with egg wash if using.
Bake for about 45 min.
Remove from oven and brush with butter, if you haven't used the egg wash.

This loaf is so versatile: use part whole wheat, add oats, add any dried or fresh herb, green onions, chives, cheeses, dill, Italian, parmesan cheese, basil, thyme, oregano, red pepper flakes, garlic, tomato sauce, black pepper......

Continue......

Wednesday, August 15, 2007

Cinnamon Walnut Raisin Bread


More swirls! For my parent's anniversary, I made a breakfast tray and included this cinnamon raisin swirl bread with honey cream cheese. Yum! I've heard a lot about Peter Reinhart's The Bread Baker's Apprentice, but this was my first recipe. Lovely! It's a very nice loaf with great texture and packed full of raisins and walnuts. It has a subtle hint of sweetness and cinnamon but not overwhelming. This is a great loaf to give to a neighbor or take to a brunch!


I used golden raisins that I plumped in hot water and they were delicious. The cinnamon swirl is optional but I think is a must--adding a bit more sweetness, flavor, and beauty. I also dusted the top with cinnamon and sugar, as suggested, right out of the oven, giving the loaves a sweet crust. It's made entirely with bread flour--next time I'm going to try all-purpose or a mixture--it was a little chewy. But a wonderful first recipe from this tasty book! Continue for recipe.

Cinnamon Raisin Walnut Bread
by Peter Reinhart, The Bread Baker's Apprentice

Makes two 1 1/2-pound loaves

3 1/2 cups (16oz) unbleached bread flour
4 t sugar
1 1/4 t salt
2 t instant yeast
1 1/4 t cinnamon
1 egg, slightly beaten
2 T shortening, melted or at room temperature
1/2 cup buttermilk or whole milk, room temp.
3/4 cup water, room temperature
1 1/2 cups raisins, rinsed and drained (**I plump my raisins in hot water--then use this water

in the recipe.)
1 cup coarsely chopped walnuts


1. Stir together the flour, sugar, salt, yeast, and cinnamon in a mixing bowl. Add the egg, shortening, buttermilk, and water. Stir together with a large spoon (or mix on low speed with the paddle attachment) until the ingredients come together and form a ball. Adjust with flour or water if the dough seems too sticky or too dry and stiff.

2. Sprinkle flour on a counter, transfer the dough to the counter, and begin kneading (or mixing on medium speed, switching to the dough hook). The dough should be soft and pliable, tacky but not sticky. Add flour as you knead (or mix), if necessary, to achieve this texture. Knead by hand for approximately 10 minutes (or by machine for 6 to 8 minutes). Sprinkle in the raisins and walnuts during the final 2 minutes of kneading (or mixing) to distribute them evenly and to avoid crushing them too much. (If you are mixing by machine, you may have to finish kneading by hand to distribute the raisins and walnuts evenly.) The dough should register 77° to 81°F (25 to 27°C). Lightly oil a large bowl and transfer the dough to the bowl, rolling it to coat it with oil. Cover the bowl with plastic wrap.

3. Ferment at room temperature for approximately 2 hours, or until the dough doubles in size.

4. Divide the dough into 2 equal pieces and form them into loaves. Place each loaf in a lightly oiled 8 1/2-by-4 1/2-inch pan, mist the tops with spray oil, and cover loosely with plastic wrap.

5. Proof at room temperature for 60 to 90 minutes, or until the dough crests above the lips of the pans and is nearly doubled in size.

6. Preheat the oven to 350°F (175°C) with the oven rack on the middle shelf. Place the loaf pans on a sheet pan, making sure they are not touching each other.

7. Bake the loaves for 20 minutes. Rotate the pan 180 degrees for even baking and continue baking for another 20 to 30 minutes, depending on the oven. The finished breads should register 190°F (85°C) in the center and be golden brown on top and lightly golden on the sides and bottom. They should make a hollow sound when thumped on the bottom.

8. Immediately remove the breads from their pans and cool on a rack for at least 1 hour, preferably 2 hours, before slicing or serving.

COMMENTARY
An alternative to the method described here is to add a cinnamon swirl. To make cinnamon sugar, stir together 1/2 cup granulated sugar and 2 tablespoons ground cinnamon. When shaping the dough, roll out each piece with a rolling pin to a rectangle 5 inches wide by 8 inches long and approximately 1/3 inch thick. Sprinkle cinnamon sugar over the surface of the rectangles and then roll up the dough into a tight sandwich-style loaf, pinching the seam closed with your fingers. When you slice the baked bread, there will be a cinnamon swirl that not only looks pretty but will also add additional cinnamon-sugar flavor.

Another trick that adds flavor is to brush the tops of the baked loaves with melted butter as soon as they come out of the bread pans, and then roll them in the cinnamon sugar. When the bread cools, the top will have an additional sweet and crunchy flavor burst.


Continue......

Sunday, July 22, 2007

Sesame Whole Wheat Sandwich Rolls


What a relaxing weekend! We have had so much rain here in Houston this summer that we're getting used to napping indoors, watching movies, and reading. Nice! The perfect weekend to make a yeasted bread. I decided to try another recipe from The Bread Bible before having to return the book to the library and chose these Sesame Whole Wheat Rolls. The egg glaze gave them a beautiful brown, shiny appearance and they smelled absolutely wonderful. They're very sturdy rolls--great for large sandwiches or BBQ. They need a substantial filling to stand up to the whole grains and bready texture. I'll probably make them smaller next time, as they are very filling. Continue for recipe.


Sesame Whole-Wheat Long Rolls
The Bread Bible, Beth Hensperger's


Yield: 16 rolls

1 1/2 cups warm water
1 1/2 T active dry yeast (1 1/2 packages)--use a little less with instant yeast

2 T brown sugar
3/4 cup warm milk
4 T butter, melted
1 T salt
2 T raw sesame seeds
1 1/2 cups whole-wheat flour
4 -4 1/2 cups unbleached, all-purpose flour or bread flour

Egg glaze: 1 large egg mixed with 1 T milk


Pour the water in a small bowl. Sprinkle the yeast and a pinch of brown sugar over the surface of the water. Stir to combine and let stand at room temperature until foamy, about 10 min.
In a large bowl, using a whisk, combine the milk, butter, brown sugar, salt, seeds, and whole-wheat flour.
Beat hard until smooth, about 3 min.
Add yeast mixture and the unbleached flour, 1/2 cup at a time.

Turn the dough out onto a lightly floured surface. Knead for about 5 min., dusting with flour only as needed, to make a smooth, soft, slightly sticky dough.
Place the dough in a greased deep bowl. and cover the plastic wrap.
Let rise until doubled in bulk, 45 min. to 1 hour.
Gently deflate the dough. Turn out onto a lightly floured surface.
Grease or parchment-line 2 baking sheets.
Divide the dough into 16 equal portions and shape each into an oblong oval.
Place the rolls 2 inches apart on the baking sheet, cover, and let rest until puffy and almost double, about 30 minutes.
Brush with the egg glaze.
Preheat oven to 375 degrees.

Bake rolls for 20-25 min. or until lightly browned.


Continue......

Sunday, July 15, 2007

Buttermilk Honey Bread


I came home from the library today with a copy of Beth Hensperger's The Bread Bible and decided to try this basic, white bread. It's a nice bread, great for sandwiches and toast. I adapted the recipe a little, using part white-whole wheat flour, and substituting instant yeast and sea salt and it turned out well. The loaf had a nicely browned crust, brushed with an egg glaze, and a great texture--not too dense but sturdy enough for sandwiches. There's a subtle hint of honey--nice flavor. It's a keeper! Continue for recipe.

Buttermilk Honey Bread
adapted from The Bread Bible

3/4 cup warm water
1 tablespoon active dry yeast (3/4 T instant yeast)
1 teaspoon sugar
1 1/2 cups buttermilk, slightly warmed
2 tablespoons butter, melted
3 tablespoons honey
1 tablespoon salt
6 cups all-purpose flour or bread flour (4 cups AP, 2 cups white whole-wheat)

Egg glaze: 1 egg mixed with 1 T milk

1. Pour water in small bowl. Sprinkle the yeast and sugar over the surface of the water. Stir to dissolve and let stand at room temperature until foamy, about 10 min. (This isn't necessary with instant yeast.)

2. In a large bowl using a whisk, or mixer fitted with the paddle attachment, combine the milk, butter, salt, 2 cups of the flour, and yeast mixture. Beat hard to combine. Add the remaining flour, 1/2 cup at a time, beating with a wooden spoon after each addition, until a shaggy dough that clears the sides of the bowl is formed.

3. Turn the dough out onto a lightly floured work surface and knead for 3-5 min., or until the dough is smooth and satiny, adding the flour only as needed to prevent sticking. (For machine, switch to dough hook and knead 3-4 min., or until smooth and springy and springs back when pressed.)

4. Place the dough in a greased large bowl. Coat the top with cooking spray and cover with plastic wrap. Let rise until doubled in bulk, 1 to 1 1/2 hours.

5. Gently deflate the dough. Turn it out onto a floured work surface. Grease two 9-by-5 inch loaf pans. Divide the dough into 2 equal portions. Place the dough in the loaf pans. Cover lightly and let rise until doubled in bulk, 30-45 min.

6. 20 min. before baking time, preheat oven to 375 degrees. Brush the egg glaze gently over the top of the loaves. Immediately sprinkle each loaf evenly with 1 tablespoon of poppy seeds, if wanted. Place the pans on the center rack (on top of baking stone--optional) of the oven and bake 40-45 minutes, or until loaves are brown, pull away from the pans and sound hollow. Transfer loaves to a cooling rack and let cool before slicing.

Continue......

Amish Friendship Breads


A friend from work gave me a bag of Amish Friendship Bread Starter last week. After 10 days of mushing the liquidy bag, building strength on my counter, the result was 2 loaves of sweet bread: Banana Pecan and Cinnamon Raisin, with enough starter to give to three friends.

This was my first time to receive the starter--a sweet mixture of yeast, milk, sugar, and flour. And although I probably won't keep mine going, it's a wonderful idea. After fermenting at room temperature for a bit over a week, it's divided into 4 parts: one to bake with, and 3 to give away. I love the concept of involving friends and family in baking. It's something very personal and satisfying to share. Giving away this bread starter encourages someone to bake who might not do so otherwise, giving them a new experience, expanding their knowledge. Continue for recipe.


Cinnamon Raisin Amish Friendship Bread

1/2 cup Amish starter (at day 10)
1/4 cup oil
1/4 cup applesauce
2 eggs
1 cup flour
1/2 cup sugar
1 t cinnamon
1/4 t salt
1/4 t baking soda
3/4 t baking powder
1/2 t vanilla
raisins

Preheat oven to 350 degrees. Grease one 9x5 inch loaf pan.
Whisk dry ingredients to mix; add rest of ingredients and mix well.
Pour into prepared pans and sprinkle top with cinnamon/sugar mixture if wanted.
Bake for 50-60 min.


Banana Nut Amish Friendship Bread

2 ripe bananas, mashed
1/4 cup oil
1/4 cup applesauce
1 rounded cup flour
1/3 cup brown sugar
2 eggs
3/4 t baking powder
1/4 t baking soda
1/4 t salt
1 t banana extract or vanilla
1/2 t cinnamon
1/2 cup Amish starter (Day 10)
1/2 cup chopped pecans or walnuts

Preheat oven to 350 degrees. Grease one 9x5 inch loaf pan.
Whisk dry ingredients to mix; add rest of ingredients and mix well.
Pour into prepared pans and sprinkle top with cinnamon/sugar mixture if wanted.
Bake for 50-60 min.

**These loaves really lasted a long time, even though they were relatively low-fat. The traditional recipe calls for the addition of a box of instant vanilla pudding. I changed mine around and left this out.

Continue......

Garlic Cheese Stromboli


How can anyone not love stromboli? Delicious! This recipe came from The Bread Bible by Beth Hensberger. The bread was really lovely. It had a tender texture and sturdy crust. I liked the garlic and mozzarella filling in the roll--it is a perfect combination for an Italian meal. Next time, I will try one with pizza sauce also. Yum!! This is a definite keeper! Recipe to come.


Garlic Cheese Stromboli


Continue......

Rose's Favorite Low-Fat Banana Bread


This is my favorite Banana Bread, hence the title of the post :). It has great flavor and the perfect sweetness. I love the cinnamon and the bananas really come through in the taste. The buttermilk and the applesauce make it very moist and delicious. The recipe makes a very large loaf--perfect for a week of on-the-run breakfasts! Continue for recipe.


Favorite Low-Fat Banana Bread

2 eggs
1/3 cup white sugar
1/3 c brown sugar
3 ripe bananas, mashed
1/4 cup applesauce (generous 1/4 cup is good)
1/3 cup milk or buttermilk
1 tablespoon vegetable oil (generous)
1 tablespoon vanilla extract
1 3/4 cups all-purpose flour
2 teaspoons baking powder
1/2 teaspoon baking soda
1/2 teaspoon salt
dash of cinnamon
1/3 cup chopped walnuts

1. Preheat oven to 325 degrees F (165 degrees C). Spray a 9x5 bread pan with non-stick cooking spray, and lightly dust with flour.

2. In a large bowl, beat eggs and sugar in a large bowl until light and fluffy, about 5 minutes. Beat in bananas, applesauce, milk, oil and vanilla.

3. In a separate bowl, sift together flour, baking powder, baking soda, salt, and cinnamon. Stir flour mixture into banana mixture, mixing just until blended. Fold in walnuts. Pour batter into prepared pan.

4. Bake in preheated pan until golden and a toothpick inserted into center of the loaf comes out clean, about 1 hour. Turn bread out onto a wire rack and let cool.

Continue......

Sunday, June 10, 2007

Classic Sourdough


This is my favorite basic sourdough bread. It's delicious--fluffy, soft interior, with a chewy crust and perfect "sourness." The crust is not too hard but is just lovely. Robert and I ate half a loaf tonight with our spaghetti. This would be great for dinner rolls, buns, or shaped in a loaf pan and used for sandwiches.

I adapted this recipe from the King Arthur's Classic Sourdough recipe that was included with their starter. I have had wonderful success with KA recipes! Continue for recipe.

Classic Sourdough

Feed starter:
Remove 1/2 and discard; add 1/2 cup water + 1 cup flour (my starter is fairly stiff); sit at room temperature overnight, or up to 12 hours.

Sponge:
1 cup fed starter
1 1/2 cup lukewarm water
3 cups KA unbleached all-purpose flour

Mix and beat vigorously; cover and let sit 4 hours (anywhere from 2-8 is ok--longer increases sour flavor; I like 4 hrs). (Refeed remaining starter and let sit at RT for awhile before storing in fridge.)

Add:
2 cups flour
1 T fine sea salt
1 scant T honey (or sugar)--optional; next time I'm going to try sugar; honey if
I'm using part whole wheat or seeds/nuts.

Knead until smooth and elastic, adding only enough flour to keep dough from sticking, approx. 3-5 min. Dough will be slightly tacky but smooth, not wet. Spray bowl with cooking spray and place dough in bowl. Cover.

Rise until doubled: 1-2 hours (1 1/2 hrs. in 80 degree kitchen).

Split dough in half; gently shape into torpedo loaves (or other shape: rolls, loaf pan, boule, etc.). Place on cornmeal covered parchment paper. Lightly spray with cooking spray. Cover.

Rise until doubled: 1-2 hours (1 hr. 45 min).

Preheat oven and baking stone to 450 degrees.
Slash tops of loaves; slide onto hot stone in oven; immediately mist oven; repeat mist once after 2 min.

Bake 20 min. until nicely browned. Cool completely on rack. Enjoy!


Continue......

Wednesday, May 23, 2007

Multi-grain Sourdough Bread


King Arthur Flour

Clay's Multi-Grain Sourdough Bread

The Baking Sheet® Vol. XIII, No. 4, Spring 2002 issue.

2/3 cup (6 1/2 ounces) sourdough starter, fed and ready to use
2/3 cup (5 3/8 ounces) lukewarm water
2 teaspoons (3/8 ounce) olive oil
1 tablespoon (1/2 ounce) sugar
1 1/4 teaspoons salt
1 1/4 to 1 1/2 cups (5 1/4 to 6 1/2 ounces) King Arthur Unbleached All-Purpose Flour
1/4 cup (1 1/4 ounces) potato flour
1/2 cup (2 1/4 ounces)King Arthur Traditional Whole Wheat Flour
1/3 cup (1 5/8 ounces) Harvest Grains Blend OR any blend of seeds and flaked or softened whole grain kernels
1 1/2 teaspoons instant yeast

*If your starter is very thin, you may need an additional 2 to 4 tablespoons of flour. The dough should be slightly shaggy during the initial 3 to 4 minutes of mixing, and soft and slightly sticky after 10 minutes of kneading.

Combine all of the ingredients in a bowl or the bowl of an electric mixer,and mix and knead to form a smooth dough. Allow the dough to rise for 1 hour; it'll become puffy, though it may not double in bulk.

Lightly grease an 8 1/2 x 4 1/2-inch bread pan. Gently deflate the risen dough, and shape it into a log. Place it in the pan, cover it lightly, and allow it to rise till it crests about 1 inch over the rim of the pan.

Bake the bread in a preheated 400°F oven for 25 to 30 minutes, tenting it with foil after 20 minutes if it's browning too quickly. When it's done, the bread will be golden brown, and will register 190°F on an instant-read thermometer inserted into the center. Remove the bread from the oven, and turn it out of the pan onto a rack, to cool completely.

Yield: 1 loaf, 16 slices.

Continue......

Sunday, May 13, 2007

Gruyere-Chive Gougeres


These airy puffs are delicious! They are light and cheesy--yum! I found the recipe on Leite's Culinaria, a fabulous website for food and recipes. I served them for Mother's Day brunch alongside Salad Lyonnaise and they were perfect. They would be great appetizers too. The recipe suggests splitting them and filling with ham, chicken, or crab salad. The Zuni Cafe has a gougere filled with pickled onions and bacon--awesome.

These are so easy to make! They only took about 15 min. to put together and then baked for 25. I used gruyere but the author used sharp cheddar cheese which sounds good too. I'll be making these again! Continue for recipe.

Cheddar-Chive Gougères
by Tori Ritchie
Party Appetizers: Small Bites, Big Flavor

Makes about 15 servings (40 to 50 gougères)

1 cup water
8 tablespoons unsalted butter, cut into pieces
1/2 teaspoon salt
1 cup all-purpose flour
4 large eggs
1 1/2 teaspoons dry mustard
1/4 teaspoon cayenne pepper
1 1/2 cups (6 ounces) shredded sharp Cheddar cheese, or gruyere
2 tablespoons minced fresh chives

1. Preheat the oven to 375°F (190°C). Line 2 baking sheets with parchment paper.
2. Put the water, butter, and salt in a medium, heavy saucepan and place over medium-high heat. Cook, swirling the pan a few times until the butter melts; once it has melted, increase the heat to high and bring the mixture to a rolling boil. Turn off the heat and dump in the flour. Beat the mixture with a wooden spoon until it starts to pull away from the sides of the pan.
3. Take the pan off the stove, set it on a counter or hot pad, and let it cool, without stirring, for 5 minutes.
4. Now, work in the eggs, 1 at a time, beating the mixture well with the spoon after each addition (you have to put some muscle into it to incorporate the eggs fully). With each addition, the dough should look glossy and slick at first, then stick to the sides of the pan before you add the next egg. After beating in the last egg, beat in the dry mustard and cayenne, then the cheese and chives.
5. Scoop up a heaping teaspoon of dough and with another spoon, push it off onto the paper-lined baking sheet (it should form a mound about 1 inch in diameter). Continue with the remaining dough, leaving an inch of space between the gougères (work in batches as necessary, the dough can stand, covered with buttered waxed paper or parchment, for up to 1/2 hour).
6. Bake until the gougères are puffy and light golden, about 25 minutes, switching pan positions halfway through. Remove from oven and let cool slightly before serving, or turn off oven and let gougères remain in oven, with door ajar, for up to 1 hour.

Recipe © 2004 Tori Ritchie.
© 1999–2007 Leite's Culinaria, Inc.

Continue......

Basil's Pain Levain


Type your summary here

Type rest of the post here

Continue......